14. Using the GemStone Administration Tools
This chapter describes the GemStone tools that are provided to allow you to manage the object sharing and protection issues discussed elsewhere in this manual.
Many of these tasks can also be accomplished by executing code within GemStone, which is more efficient for large repositories. In addition, there are some administration operations that are not supported by the tools, and must be done by executing GemStone server code. See the System Administration Guide for the GemStone/S server, for details on both the full set of administrative options and instructions on performing these tasks programmatically.
Many administrative operations involve privileged methods, and may include the requirement to have write authorization to DataCuratorObjectSecurityPolicy. These operations are most often done while logged in as DataCurator. If you do not have authorization to log in as DataCurator, and need to before performing administrative tasks, ask your system administrator to set up your account with the appropriate groups and privileges.
14.1 Security Policy Browser
The Security Policy Browser allows you to inspect and change the authorization that GemStone users have at the object level. As explained in the section entitled “Object-level Security” beginning here, each object in GemStone may be associated with an object security policy. The only users authorized to read or modify an object are those who are granted read or write authorization for the security policy with which the object is associated. The Security Policy Browser also allows you to add and configured Security Policies, and examine and change group memberships.
NOTE
In the 32-bit GemStone/S server product, and in GemStone/S 64 Bit 2.x, object security policies are known as Segments.
To open a Security Policy Browser, select Browse > Security Policies from the GemStone Launcher or through the User Dialog’s Object Security Policies button.
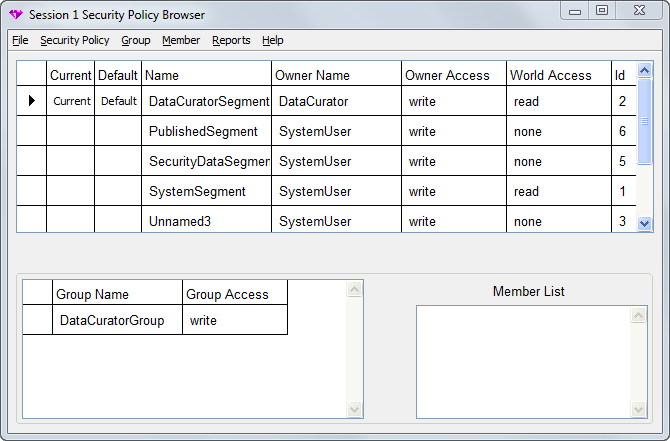
The Security Policy Browser is divided into three sections. The upper section displays security policies; the lower left displays groups in a selected Security Policy, and the lower right displays members in the selected group.
Security Policy Pane
The security policy pane at the top of the window displays the security policies in SystemRepository.
You will notice that some security policies are named and some are unnamed. Named security policies are security policies that are referenced in a Symbol Dictionary that you have access to, such as Globals (for named kernel Security Policies). A Security Policy’s name can be used to reference it in code, but does not affect it functionally.
In addition to the security policies displayed in the Security Policy Browser, all users also have read and write authorization to GsIndexingObjectSecurityPolicy. Because authorization changes should not be made to that security policy, it is not included in the tool.
NOTE
Changes made to cells in the tables are accepted automatically as soon as you either press Return, make a selection in a combo box associated with the cell, or simply move the focus to another cell or field by moving the mouse. Entering an invalid value in a cell results in a warning, and the cell reverts to the original value.
In the security policy definition area, the table displays and allows you to edit the following:
Current—You can set the security policy to be your current security policy. When you create any objects in GemStone, the objects is assigned it to your current security policy.
Default—You can set the security policy to be your default security policy. When you log into GemStone, your current security policy is set to this default. If a user does not have write access to their default security policy, they will be unable to log in.
Name—This displays the name of the Object Security Policy, but does not update your dictionaries with any changes.
Owner Name—You can enter any valid user name that already exists in the system. To change an owner name, type a valid owner name into the cell. This may remove access for the previous owner, depending on the groups and world access.
Owner Access and World Access—To change owner and world access, type one of the following values into the respective cells:
- read means that a user can read any of the security policy’s objects, but can’t modify (write) them or add new ones
- write means that a user can read, modify, and delete any of the security policy’s objects and create new objects associated with the security policy
- none means that a user can neither read nor write any of the security policy’s objects
NOTE
Be careful when changing the authorizations on any security policy that a user may be using as a current or default security policy. If the account does not have write authorization in its default security policy, the account cannot log in.
Id—The Security Policy Id number of each security policy is displayed. This information cannot be modified.
Security Policy Menu
Use the Security Policy menu bar item, or the security policy pane pop-up menu, to create new security policies and to set current and default security policies for yourself. The following options are available:.
Create... Creates a new security policy. In the Create Security Policy dialog, enter a name for the security policy and a symbol dictionary in which to create the named reference. Private security policies would usually have the name in that user’s UserGlobals, while those for large groups of users may be kept in Globals or in a the SymbolDictionary that is used by all these users.
Make Current Makes the selected security policy your current security policy. When you create an object, GemStone assigns it to your current security policy.
Make Default Makes the selected security policy your default security policy. This is the security policy used for your current security policy when you log into GemStone. Users must have write access to their default security policy in order to log in.
Group Pane
The bottom left of the window is the Group pane. In this area you can assign authorizations to groups of users instead of individuals. Groups are typically organized for users who have common data access requirements.
When you select a security policy in the Security Policy Pane, the group pane displays the groups that have access to the security policy. When you select one of the groups, its members appear in the Member Pane to the right.
Group Name—You can change the group name, but you should be aware that when you edit a group name, you are not just renaming the group; you are actually replacing the group with a new one. The old group’s members are not copied to the new one, so you need to add them again. If the name of the group entered is a group that does not exist, you will be asked if you want to create it.
Group Access—Group access can be changed in the same way as owner and world access. To change group access, type either read or write into the cell, as outlined for owner and world access here.
NOTE
Be careful when changing the authorizations on a group or removing member. If a user is using the group for access to their default security policy, and the group or user membership is removed or authorization changes, the account cannot log in.
Group menu
Use the Group menu bar item, or the group pane pop-up menu, to add and remove groups from a security policy. The following options are available:
Add... Adds a new group. In the Add Group dialog, enter a name for the group and choose OK or Apply.
Remove... Removes authorization for the selected group. This does not delete the group from GemStone. It only means that the current security policy no longer stores access information for that group. Users may still be able to access other objects because of their membership in the group, but they will not have access to the objects assigned to this security policy unless it has been provided by the security policy’s owner or world access.
Member Pane
The bottom right of the window is the Member List. When a group is selected, this displays the members of the group.
Member Menu
Use the Member menu bar item, or the Member pane pop-up menu, to add and remove members from a group. The following options are available:
Add... Adds a user to the group. Enter any valid user name in the Add Member dialog and choose OK. The user must already exist in the system.
Remove... Removes the selected user from the group. (This does not delete the user from GemStone, only from the group)
Security Policy Tool Menus
The following additional menus are available in the Security Policy Browser.
The File Menu
Use the File menu to commit work done in the Security Policy Browser, to abort the transaction, to update the tool’s view of security policies, groups, and users in the current session, and to close the Security Policy Browser.
Commit Commits all the changes made anywhere in GemStone during the current transaction. After you commit, you are given a new, updated view of the repository.
Abort Cancels all changes that you have made anywhere in GemStone since your last commit. After you abort the transaction, you are given a new, updated view of the repository.
Update Updates the information in the current window: gives you a new, updated view that reflects the most recent version of the repository.
Close Close the window. Any changes made are kept, but not committed to the repository.
Reports Menu
Use the Reports menu to bring up a window displaying information about the security policies, users, and groups in your view of the repository. Use the report window’s Print button to print a report, and use the Cancel button to close the window.
Group Report Produces a list of all groups in GemStone and the users in each group.
Security Policy Report Produces a list of security policies the user has read authorization for and displays information about each one: its owner, its groups, and the access privileges for owner, groups, and world.
User Report Produces a list of all GemStone users and shows each user’s group memberships.
Using the Security Policy Browser
If you are a security policy’s owner, you can determine who has access to objects assigned to that security policy. For more information, see the chapter on administering user accounts and security policies in the System Administration Guide.
Checking Security Policy Authorization
To find out who is authorized to read or write that security policy, do the following:
1. Bring up the Security Policy Browser by selecting Browse > Security Policies or by choosing Object Security Policies in a GemStone User Dialog.
2. Choose Reports > Security Policy Report. The resulting list contains all security policies.
3. To view the members of each group, choose Reports > Group Report. To view the groups to which each user belongs, choose Reports > User Report.
Changing Security Policy Authorization
Assuming that you have appropriate privileges and access, you can use the Security Policy Browser to change the authorization of a security policy.
The top half of the Security Policy Browser shows the owner, the owner’s access, and world access for each security policy in the repository. To change owner or world access for a security policy, click in the corresponding box, then use the pull-down menu to select the new permission (“read”, “write”, or “none”).
The new authorization will take effect when you commit the current transaction.
CAUTION
Be careful to check whether a user is logged in before you remove write authorization. A user will be unable to commit changes if write authorization is removed from the current security policy, and if it is the user’s default security policy, the user’s session will be terminated and the user will be unable to log in again.
Controlling Group Access to a Security Policy
If you are authorized to set up or change group access to a security policy, you can add or remove groups to that security policy’s authorization list.
- Make sure the security policy is selected in the top half of the browser.
- To add a group to the authorization list for the selected security policy, choose Add... from the Group menu. Enter the group name in the dialog box that appears. If the group does not exist in the repository, you will be asked whether to create it.
- To remove a group from the authorization list, first select the group by clicking in the first column of the groups list. Then choose Remove... from the Group menu. You will be asked to confirm the action.
- To change the type of access for a particular group, first select that group in the groups list and select the existing permission. Then enter the new permission (“read” or “write”).
- To add a member to a group that has access to this security policy, first select that group in the groups list. Then choose Add... from the Member menu. Enter the UserId and choose OK. (A UserProfile with that UserId must already exist in the repository.)
- To remove a member from a group that has access to this security policy, select the UserId in the member list and choose Remove... from the Member menu. You will be asked to confirm the action.
Remember to commit your transaction before logging out. A convenient way to do that is by choosing Commit from this tool’s File menu.
14.2 Symbol List Browser
The Symbol List Browser is a tool for examining the GemStone SymbolLists associated with UserProfiles, adding and deleting dictionaries from these lists, examining the entries in those dictionaries and adding, deleting and inspecting the entries. References to dictionaries and dictionary entries can be copied between GemStone user accounts, subject to authorization and security policy restrictions, to allow users to share application objects and name spaces developed by other users, and to publish them to other users.
To open a Symbol List Browser, select Browse > Symbol Lists from the GemStone Launcher, or click on the Symbol List button on a User Dialog.
Like the other GemStone tools, the Symbol List Browser opens on a particular login session. When a Symbol List Browser instance is created, it is attached to the current GemStone session and remains attached to that session until the browser is closed.
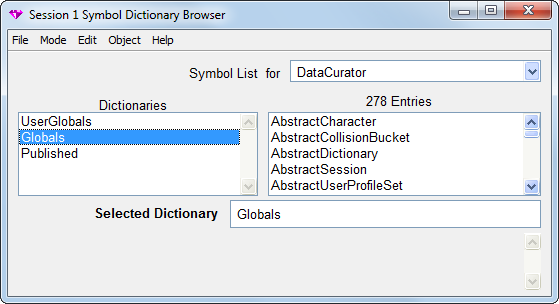
The field labeled Symbol List for contains a list of all the GemStone users that are visible to the session to which the browser is attached. When you select a GemStone user name, a list of the dictionaries in that user’s SymbolList is displayed in the Dictionaries pane. GemStone permissions are observed; any dictionaries in that SymbolList that are not normally accessible to the browser’s session will not be visible in the list.
When a dictionary is selected, the keys of the entries in the dictionary are displayed in the Entries pane on the right.
Whenever a dictionary or an entry is selected, information about that object is displayed at the bottom of the browser.
The Clipboard
Within the Symbol List Browser you can delete, move, and copy objects to and from SymbolLists and the Dictionaries in those SymbolLists. For each session to which a Symbol List Browser is attached, there is a “clipboard” onto which GemStone server objects can be cut and copied and from which objects can be pasted into another Symbol List Browser that is also attached to that session.
Symbol List Browser Menus
The menus in the symbol list browser allow you to examine, add, and delete SymbolLists, dictionaries, and dictionary entries. You can use this browser to copy references to dictionaries and dictionary entries among user accounts so application objects can be shared by other users.
File Menu
The File menu contains items for operating on the window itself and for committing and aborting transactions.
Commit Commits all the changes made anywhere in GemStone during the current transaction. After you commit, you are given a new, updated view of the repository.
Abort Cancels all changes that you have made anywhere in GemStone since your last commit. After you abort the transaction, you are given a new, updated view of the repository.
Update Updates the information in the current window: gives you a new, updated view that reflects the most recent version of the repository.
Close Close the window. Any changes made are kept, but not committed to the repository.
Mode Menu
The Mode menu allows you to switch from dictionary mode to entry mode. In dictionary mode, you can select entries and dictionaries from the lists. In entry mode, you can edit or enter new text in the Symbol List and Selected Entry fields.
Edit Menu
In Dictionary Mode, the Edit menu allows you to rearrange dictionaries by cutting, copying, or pasting. In Entry Mode, the Edit menu allows you to rearrange entries by cutting, copying, or pasting.
Cut Dict In Dictionary mode: Removes the selected dictionary from the
Cut Entry user’s symbol list and places it in the session’s clipboard.
In Entry mode: Removes the selected entry from the selected Dictionary and places it in the session’s clipboard.
Copy Dict Copies a reference to the selected item (a dictionary or an entry,
Copy Entry depending on which mode is in effect) into the session’s clipboard.
Paste Dict In Dictionary mode: Causes the reference to the dictionary object
Paste Entry in the clipboard to be added to the SymbolList in the pane, with the name it had when it was put in the clipboard.
In Entry mode: Causes the reference to the entry in the clipboard to be added to the selected dictionary, with the name it had when it was put in the clipboard.
In both modes: If the clipboard item’s name is already in use in the destination list, a Confirmer will pop up to allow replacing the old item, or to abort the paste operation.
Object Menu
The Object Menu allows you add a new dictionary, open an inspector on a dictionary entry, and open a browser on a class that is contained in a dictionary.
Add Dict Prompts for name of a new item to be added to the Dictionary or
Inspect Dict Opens a GemStone inspector on the selected item.
Browse Class If the selected entry is a class, opens a GemStone class browser on that entry. Performs the same operation in either Dictionary or Entry mode.
14.3 User Account Management Tools
GemBuilder provides three User Account Management tools that allow the GemStone System Administrator to create and modify user accounts, change account passwords, and assign group membership. This section describes these three tools: the User List, the User Editor, and the Privileges Dialog.
NOTE
To perform most of the system administration functions described in this section, you must either be DataCurator or belong to the DataCuratorGroup.
If you are responsible for GemStone system administration, refer the chapter on administering user accounts and security policies in the GemStone System Administration Guide for specific information on user account management. That chapter discusses the privileges you need to manage user accounts and explains how to add and remove users, set up user environments, change passwords and user privileges, and how to add and remove users from groups.
User List
The User List contains a list of all user accounts known to the current repository. The administrator can use this window to delete users and as a starting point to add new users and to change the attributes of GemStone users.
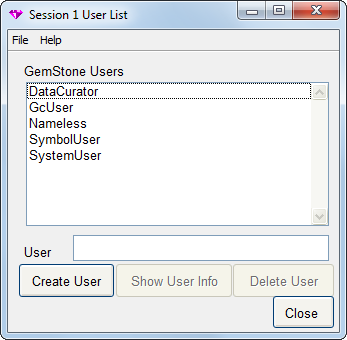
The User List window has two menus: File and Help.
The File menu contains the following items:
Commit Makes all changes in the current transaction permanent.
Abort Aborts the current transaction.
Update Causes the browser to update its view of the GemStone users it shows. The browser will automatically be updated if the attached session aborts a transaction.
Close Close the browser. Changes are retained in the image, but not committed to the repository.
The Help menu contains one item, Session Info, which provides information about the session for the GemStone User List and about the current session.
The following buttons are available on this window:
Create User Brings up a User Editor in which you can define a new user.
Show User Info Brings up a User Editor displaying privilege and group membership information for the selected user.
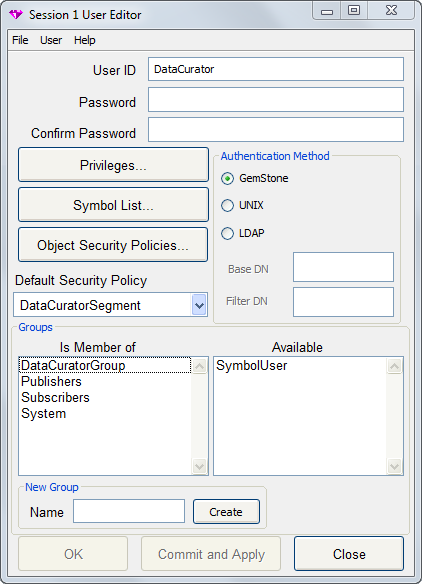
User Editor
The User Editor displays the attributes of a particular GemStone user. The GemStone administrator can examine and change the user’s privileges or default security policy and can control the user’s group membership.
NOTE
When using 32-bit GemStone/S or GemStone/S 64 Bit v2.x, the User Editor layout is substantially different. However, the basic functions are the same.
The following buttons and operations are available in this window:
User ID The GemStone User ID that you are viewing details on. When creating a new user, fill in this with the new user’s id.
Password Enter the user’s initial password when creating a new user. This is blank for existing users.
Confirm Password Confirm (re-enter) the user’s initial password when creating a new user. This is blank for existing users.
Privileges... Brings up a Privileges Dialog, in which you can select privileges for this user.
Symbol List... Brings up a Symbol List Browser for this user.
Object Security Policies...
Brings up a Security Policy Browser.
Default Security Policy Allows you to select an existing security policy to be the default security policy for this user.
Authentication Method Click the button to indicate the method for performing authentication for this user: GemStone userId and GemStone password, UNIX user ID and password, or LDAP server.
Authentication other than GemStone is only available in GemStone/S 64 Bit v3.0 and later. For details on configuring authentication, see the chapter on “User Accounts and Security” in theSystem Administration Guide.
Groups The list on the left is the list of groups that this user belongs to; the list on the right is the list of available groups.
- To add a user to a group, select the group in the Available list and drag it to the Is Member Of list.
- To remove a user from a group, select the group in the Is Member Of list and drag it back to the Available list.
New Group Name and Create
In the Name entry box, enter the name of the new group that you wish to create, then click this button. The user is added to the new group.
OK Makes all changes in the current transaction permanent, and close the dialog.
Commit and Apply Makes all changes in the current transaction permanent.
Close Close the dialog. Changes are retained in the image, but not committed to the repository.
File Menu
The File menu contains items for operating on the window itself and for committing and aborting transactions.
Commit Commits all the changes made anywhere in GemStone during the current transaction. After you commit, you are given a new, updated view of the repository.
Abort Cancels all changes that you have made anywhere in GemStone since your last commit. After you abort the transaction, you are given a new, updated view of the repository.
Update Updates the information in the current window: gives you a new, updated view that reflects the most recent version of the repository.
Close Close the window. Any changes made are kept, but not committed to the repository.
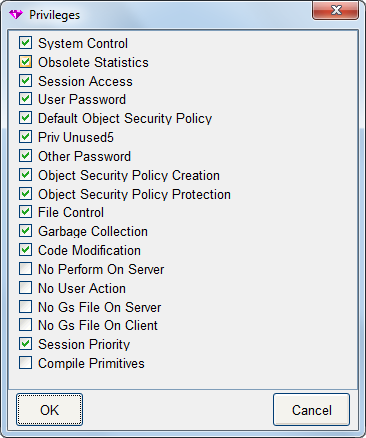
Privileges Dialog
Many functions in GemStone require privileges. For example, in GemStone/S 64 Bit, users require Code Modification before they can create classes and methods. Other privileges control global garbage collection, stopping and starting other sessions, access to external files, and performing operations on the host Operating System. Each user may be granted or not granted these privileges. The specific list of privileges varies slightly by product and version. Refer to the System Administration Guide for details on the privileges.
The privileges dialog displays the privileges an individual user possesses. You can use this dialog to examine a user’s privileges, and—if you have the authority—to modify privileges for a user.
The Privileges Dialog is opened from the User Editor. It is shown in Figure 14.5.