1. Installing GemBuilder for Java
This Installation Guide describes how to install GemBuilder for Java (GBJ) into a GemStone/S 64 Bit Repository, and how to configure Java clients to log in to the GemStone Repository using GBJ.
This version of GemBuilder for Java supports GemStone/S 64 Bit v3.3 and later only.
For details on the changes in this version of GBJ, see the GemBuilder for Java Release Notes for version 3.1.2.
The GemBuilder for Java installation process includes installing the GBJ interface files into the GemStone repository, and configuring your system to allow a GBJ Java application to log into GemStone. You need only install the GBJ interface files into the server once for each release of GBJ, but each Java client must be configured for login.
System Requirements
GemStone Server Product and Platform
A supported GemStone object server version, installed on a network-accessible host. GemBuilder for Java version 3.1.2 is supported with GemStone/S 64 Bit version 3.3 and later only.
Supported platforms for the GemStone/S 64 Bit version 3.3 are provided in the GemStone/S 64 Bit version 3.3 Installation Guide.
Server keyfile
With versions of GemStone/S 64 Bit after v3.2 and GemBuilder for Java v3.1.2, authorization for using GemBuilder for Java is provided by the GS/64 keyfile. You will need to have a keyfile that provides authorization for use with GemBuilder for Java in order to use GemBuilder for Java. If you require a keyfile, write to keyfiles@gemtalksystems.com, or contact GemTalk Technical Support.
Operating System
You may run GBJ clients on a platform other than the GemStone server platform, provided you use the appropriate client libraries for your GemStone server version and the client platform.
GemBuilder for Java version 3.1.2 is tested and supported on the following platforms, for the specified GemStone/S 64 Bit server version:
Installing GemBuilder for Java into the GemStone Server
The following instructions describe installing the GemBuilder for Java Smalltalk code into your GemStone/S 64 Bit repository. Once the GemBuilder for Java code is installed, you will configure your client machines to log in to this repository.
If you are upgrading from an older version of GemBuilder for Java, follow this process to install version 3.1.2.
Prepare for Installation
1. Select an installation directory, installdir, and make this directory the current working directory.
You can install GemBuilder for Java in any directory. We recommend installing GBJ at the same level as the GemStone server installation directory. You will need about 6 MB of free disk space.
2. GemBuilder for Java is provided as a zipped archive file, GemBuilderJava3.1.2.zip. Move this distribution file to the directory location in which GemBuilder for Java will be installed.
3. Unzip the distribution file using unzip.
InstallDir now contains a GemStone directory with a name similar to GemBuilderJava3.1.2. In the instructions that follow, we refer to this directory as gbj_directory.
gbj_directory includes the following:
version.txt
README.txt
PACKING.txt - list of file contents
gbj312.jar - the Java class library
gbjopensrc312.jar - class library containing open source libraries
GbjTest.zip - example Android application
README.android.txt - readme for Android application
doc - directory containing GemBuilder for Java javadocs documentation:
index.html - the entry point for the online javadocs documentation
api - directory containing support files for the online javadocs documentation.
copyinfo.html - intellectual property ownership information
open_source_licenses.txt - licenses for open-source components.
sources.html - Further information and GemStone Technical Support
server - directory containing:
GbjFileinReader.gs
GbjGciForwarder.gs
GbjGciInterface.gs
GbjHypericServerTemplate.xml
GbjHypericServiceTemplate.xml
GbjJmxCommandsTemplate.dat
GbjJmxSystemStatsTemplate.dat
GbjToolsInterface.gs
install.gs
Environment Setup
GemBuilder for Java version 3.1.2 requires several environment variables to be set prior to installation, including the path.
1. The GEMSTONE environment variable, $GEMSTONE, should be set to the GemStone server installation directory. This is described in the GemStone server documentation. To verify that this is set correctly, use the echo command.
For example, on a platform running Linux:
% echo $GEMSTONE
/users/GemStone64Bit3.3.0-x86_64.Linux
2. Your path should include the path for the Gemstone Server executables,
$GEMSTONE/bin.
3. $GBJ should be set to the GemBuilder for Java installation directory.
% setenv GBJ gbj_directory
$ GBJ=gbj_directory
$ export GBJ
Installing GemBuilder for Java into your Repository
1. If necessary, start up the GemStone repository monitor (Stone). You may also want to start a NetLDI for use later in testing the GBJ installation.
2. At a command prompt, cd to a working directory, in which you want the installation log to be created. You must have write permission for this directory.
3. Log in to the GemStone server as SystemUser, using linked Topaz. Use the -i switch, which keeps Topaz from reading any initialization file you might have. For instance:
prompt> topaz -i -l
topaz> set gemstone gs64stone
topaz> set user SystemUser password swordfish
topaz> login
successful login
4. File in the server component, which is located in the server directory of the GemBuilder for Java installation tree.
topaz 1> input $GBJ/server/install.gs
During the file-in operation, output is directed to the file Gbj312ServerFilein.log in the current directory.
The file-in operation should end with a message that the errorcount is 0. If errorcount is not 0, errors have occurred; contact GemStone Technical Support, providing the file Gbj312ServerFilein.log as well as details about the installation process.
topaz 1> quit
Your GemStone server is now ready for use by GemBuilder for Java clients.
Client Setup
Preliminaries
1. Verify that TCP/IP networking software is up and running on your client machine, and that there is a network path to the Stone’s host.
% /usr/sbin/ping hostname 1 1
% /etc/ping hostname 8 1
% /bin/ping -c 1 hostname
% /sbin/ping -c 1 hostname
where hostname is the name of your node or the Stone host. If ping responds with statistics or “hostname is alive,” you have verified that TCP/IP is functional.
Copy GBJ files to the client
If you are running the GBJ client on the same machine as the GemStone server, you can set your CLASSPATH and PATH or LD_LIBRARY_PATH to existing GBJ and server installation directories. However, if you are running the GBJ client on a separate machine, you will need to set up the client machine with the correct files.
1. Get the required GBJ jar files
If you are running the GBJ client on the same machine as the server, use the existing location configured in $GBJ.
If the GBJ client is on a different machine, install the GBJ distribution on the client. You may install these from the distribution archive as was done on the server, as described under Prepare for Installation. You may also copy these files from the server installation.
The required files from the GBJ distribution are the jar files, gbj312.jar and gbjopensrc312.jar. However, the javadocs provide key documentation for GBJ functions and should also be copied to the client.
The directory containing the GBJ jar files accessible to the client will be referred to as gbj_jar_dir.
2. Get the correct GBJ and GCI client shared libraries
The GBJ clients require access to both the GCI shared libraries and the GBJ shared library. All these shared libraries are specific to the server product and version and to the client platform.
The GBJ shared libraries are also specific to the version of GBJ. They have a name of the form:
libgbjgciGbjVersion-ServerVersion-64.extension
To indicate the GBJ and GemStone/S 64 Bit version numbers.
If you are running the GBJ client from a machine other than the GemStone server machine, copy the GCI client libraries to a location accessible from the client machine. If this is a different platform than the one the GemStone server is running on, you may need to use the GemStone server distribution for a platform other than your server platform to locate the correct libraries. Contact GemStone Technical Support if you cannot locate the correct client libraries.
The client libraries are located in the directory $GEMSTONE/lib on UNIX or Linux. The following files are required:
libgbjgci312-3.3.0-64.so
libgcirpc-3.3.0-64.so
libssl-3.2.0-64.so
There are also linked versions of the GCI client libraries, which you may use in custom GBJ applications. The GBJ tools support only RPC logins.
Note that only 64-bit applications are supported with GBJ.
The directory containing the server GBJ and GCI shared library files will be referred to as shared_library_dir.
Environment variables
1. The CLASSPATH environment variable must include the GBJ class library, gbj312.jar, and the open source library gbjopensrc30.jar. These must be in a directory accessible from the client, as described above in Get the required GBJ jar files.
To set the CLASSPATH on UNIX or Linux:
% setenv CLASSPATH $JDK/lib:gbj_jar_dir/gbj312.jar:gbj_jar_dir/gbjopensrc312.jar
$ CLASSPATH=$JDK/lib:gbj_jar_dir/gbj312.jar:gbj_jar_dir/gbjopensrc312.jar
$ export CLASSPATH
2. Set the shared library path environment variable to include the client library directory, shared_library_dir, as described above in Get the correct GBJ and GCI client shared libraries.
On UNIX and Linux, the LD_LIBRARY_PATH environment variable must include the directories containing the GCI and GBJ shared libraries. For example:
% setenv LD_LIBRARY_PATH shared_library_dir
$ LD_LIBRARY_PATH=shared_library_dir
$ export LD_LIBRARY_PATH
3. If you have not already done so, add the Java executable directory to the path. To use the GBJ tools, you must have the Java executable directory, such as the JDK bin directory, on your path.
To set this on UNIX or Linux, for example
% set path=($JDK/bin $path)
$ PATH=$JDK/bin:$PATH
$ export PATH
Start up the GBJ Launcher and log into GemStone
1. Invoke the GBJ Tools Launcher, com.gemstone.tools.GbjLauncher.
This tool supports the following options on the command line:
- help — print a help message (to standard output)
- version — print GBJ version information
- UseLogFile filename — write log output to the specified file
- NoFileLogger — send log output to standard output rather than to a file
- UsePrefFile filename — use the specified file for the preferences file
- NoPrefFile — do not load or save a preferences file
To invoke the GBJ Tools Launcher:
prompt> java -d64 com.gemstone.tools.GbjLauncher [options]
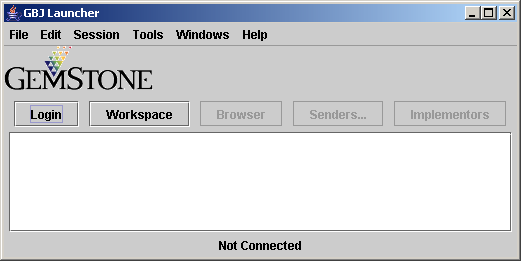
This opens the GBJ Tools Launcher
To log in to GemStone, you must have a GemStone server and NetLDI running on the GemStone server machines.
2. In the Tools Launcher, click Login to begin a session. A Session Parameters Dialog appears, prompting you for the session parameters.
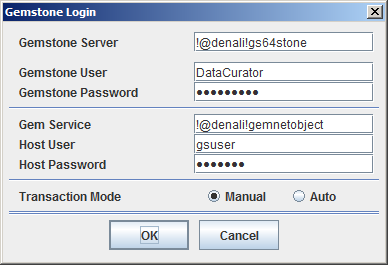
3. Fill in the session parameters, as described in Table 1 . When you’re done, click Ok.
4. A successful login results in the event being recorded in the Launcher’s Text Pane, which serves as a transcript. Additional buttons are activated, and the Login button becomes Logout.
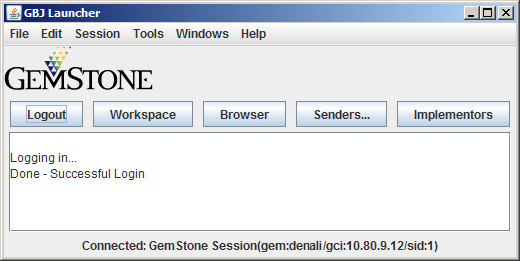
After you have successfully logged in to the GemStone server, you have verified that your GemBuilder installation is correct. To end the session, click Logout. To close the launcher, choose File > Exit.
If the login attempt did not succeed, examine the error message to determine the reason. To change your session parameter settings and try again, click Login.
For more information on login parameters, see the GemBuilder for Java Programming Guide and the GemBuilder for Java Tools Guide.
The GemBuilder for Java Tools Guide provides more information on using the GBJ tools available from the GBJ Launcher.